1.Abstract
Today, I bring you a lightweight VPS probe — Beszel, which allows you to monitor the status of your VPS in real-time, including CPU usage, memory usage, disk I/O, Docker container usage, and bandwidth consumption. It even lets you view your VPS usage logs and includes some fine-grained alerting features. In this article, I will detail the pros and cons of Beszel, along with the installation tutorial and usage guide.
2.Choosing the Right VPS for the Probe
In fact, setting up a probe doesn't require high configurations. The probe’s purpose is to help you monitor and record data in real-time. If you don't have a VPS and want to play around with probes, you can try some affordable overseas VPS providers that I’ve been recommending: VMRack and BandwagonHost. The former is what I’m currently using, offering good network quality and great cost-performance. The latter is a reliable old brand that I have used before, known for its stability. If you just want to try out probes or do some small-scale testing, the low-end configurations of VMRack and BandwagonHost will suffice.
VMRack Configuration Purchase:
BandwagonHost Configuration Purchase:
3.Understanding the Probe — Beszel
Beszel is a lightweight probe designed specifically for individual users and small businesses for ease and speed. From a user perspective, it may not be as feature-rich as the Nezha Probe, but it doesn’t require repeated logins (unlike Nezha), and its resource usage is minimal.
Official Website: Beszel
Pros:
Lightweight: Minimal resource usage, simple and clean interface.
Easy to Install: Install with a single command.
Supports Chinese: The version currently supports the Chinese language.
Comprehensive Features: Includes VPS configuration alerts, auto-statistics, Docker statistics/installation.
Cons:
IPv6 Compatibility: Not friendly with IPv6.
Login Required: Cannot access directly without logging in.
Cannot Test VPS Latency: Lacks VPS latency testing.
No Map Display: Does not display geographical data.
4.Installing Beszel
First, log in to your server and use the Beszel Hub installation command. If you don’t know how to log in to your server, check out my previous article, "A Detailed Guide on Using Your First Cloud Server."
After logging in, execute the following command:
curl -sL https://raw.githubusercontent.com/henrygd/beszel/main/supplemental/scripts/install-hub.sh -o install-hub.sh && chmod +x install-hub.sh && ./install-hub.sh
After installation, you will see the Beszel management interface.
If the download times out, you can directly use a GitHub file acceleration proxy.
4.1 Login Interface
After completing the installation, you can use the registration and login interface.
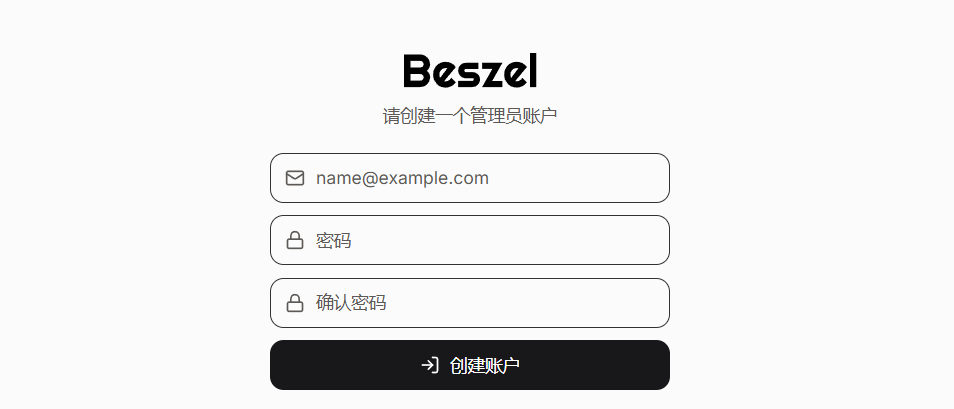
Once logged in, you can change the default password.
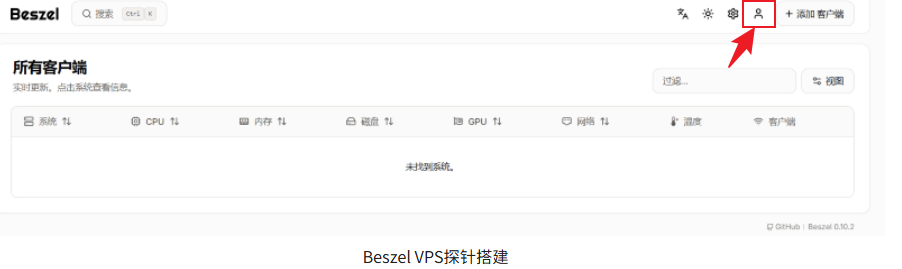
4.2 Monitoring Existing VPS Servers
In the Beszel Hub management interface, click the “Add Client” button in the upper-right corner, then select “Binary” and enter the IP address of the VPS you want to monitor.
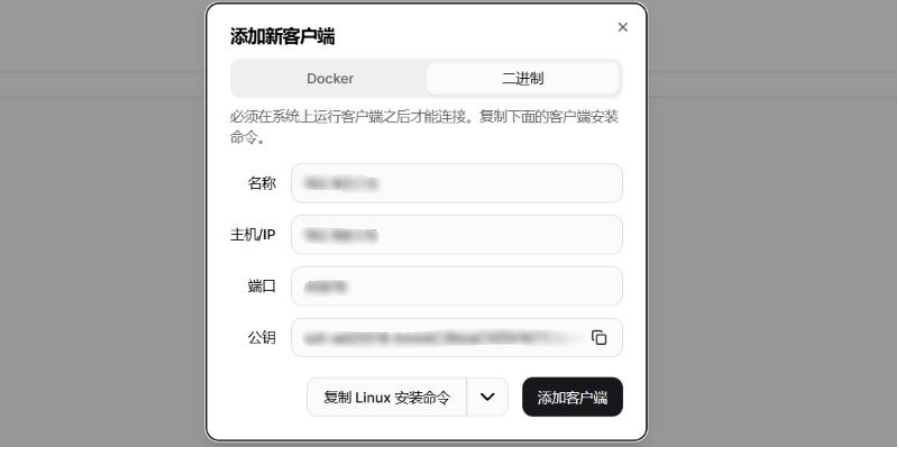
After adding the client, the system will generate a command.
curl -sL https://raw.githubusercontent.com/henrygd/beszel/main/supplemental/scripts/install-agent.sh -o install-agent.sh && chmod +x install-agent.sh && ./install-agent.sh -p 45876 -k "ssh-ed25519 AAAAC3NzaC1lZDI1NTE5AAAAIIYLYY/F1SgxdctvNJwzAbNHl0qaGA68BI4GY3uU06w/" --china-mirrors
Copy and paste this command into the VPS you want to monitor (you can add multiple machines).
5.VPS Monitoring Data
Once added, you can see real-time data for your VPS in the Beszel management interface.

To view the data more intuitively, simply click on the specific server.

Thus, the probe setup is complete, and it’s quick and easy.
Summary
Overall, with the detailed steps in this article, we successfully completed the VPS probe setup. If you install it in real time, it will take no more than 5 minutes. Beszel, with its lightweight nature, easy installation, and simple interface, has become a favorite probe for many users. I hope this guide will help more friends who have similar needs!